Updating Your GregTech:New Horizons server
Thanks to the Reizor Panel's functionality, this is an absolute breeze to do.
IMPORTANT: Before doing anything with upgrading your server, we recommend you take a backup via our panel so that you can restore your world if anything goes wrong during this process.
Selecting a Version
To get started, head over to the Settings tab, and look for the box titled 'GT:NH Version Switcher.'
Once there, you'll see a few options. We'll break down each option one by one.
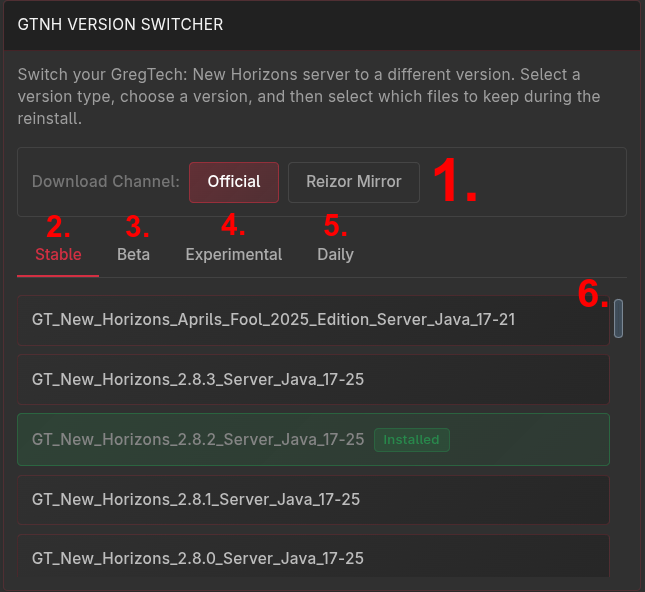
- This is where you can select the download source for the Stable and Beta channels. The Official is pulled from downloads.gtnewhorizons.com and the Reizor Mirror pulls from our mirror that resides within our intranet. It's recommended to use our mirror for most cases due to the increased download speeds, but either should work, assuming the official downloads server isn't experiencing network issues.
- This is the stable channel. Selecting this will show all of the server packs that are considered to be "stable" releases.
- This is the beta channel. When there are official betas or release candidates (RCs), they will appear here.
- This is the Experimental channel. These are builds of the modpack that will have the newest features, but may be more unstable than the previously mentioned variants.
- This is the Daily channel. These are builds of the modpack that contain handpicked changes from the experimental channel, so you will find new features here, but these will typically be a little more stable than experimental builds due to the manual intervention required to get a change into a daily release.
- This is the listing of all available server packs for your selected build type. If you have previously used this tool or if your server was created on or after December 12th, 2025, you will see "Installed" next to the version you currently have installed.
Picking Files to Keep
Once you select a version and press "Continue," you will be brought to the file selection screen. This screen is where you can select files to keep once your server is upgraded.
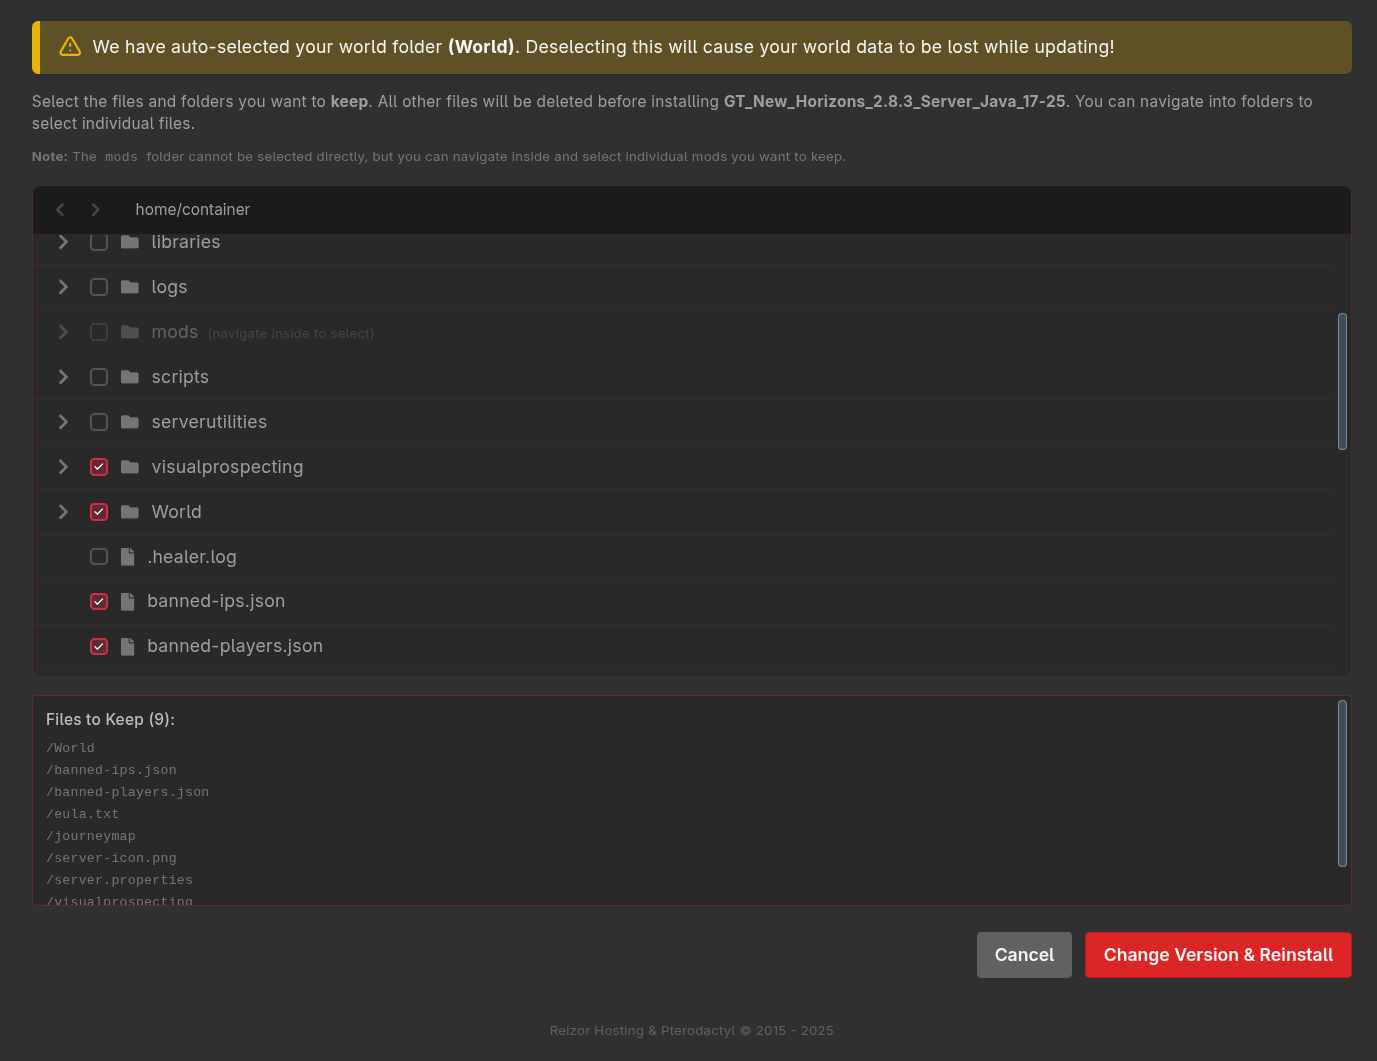
Your world folder will be pre-selected (It will read your server.properties file to find the name if it is not the default world name). It is critical that you do not de-select your world folder, unless you want it to be deleted during the upgrade process.
We have plans to add more files to be automatically selected to be kept, if you have feedback for us or want to suggest anything to be added to that list, we encourage you to reach out to us and let us know what we should add.
Here's a breakdown of some other files you may want to keep.
- The entire
backupsfolder (If you're using these instead of panel backups) - The entire
journeymapfolder - The entire
serverutilitiesfolder - The entire
visualprospectingfolder banned-ips.jsonbanned-players.jsoneula.txtops.jsonserver-icon.png(If you have replaced the default one with a custom one)server.propertieswhitelist.json- Any config files you modified (ex:
config/gregtech/Pollution.cfg) - Any mods you added to your pack (Twist Space Technology, GTNH Web Map, AE2 Web Integration, JourneyMap Unlimited, etc)
- Any configs for any mods you added
- If you have GTNH Web Map installed, make sure to keep the
dynmapfolder so that you don't have to re-generate the tiles for the web map. (Note: This will probably add a large amount of time to the backup and re-extracting steps of the update process, so don't worry if it takes a while and you have this folder)
Selecting the entire mods folder is intentionally disabled because during the upgrade the new mods will be populated from the new server pack. You should not attempt to keep any mods that are included with the base pack. The only exception to this may be if you're replacing mods with experimental/other versions of mods, in which case you will need to keep the mod and then delete the one that comes with the modpack after reinstallation.
Updating
Once you confirm the files you want to keep, your server will be reinstalled. It goes through a few steps to update your server:
- Stops the server.
- Finds all of the files you selected to save.
- It then deletes all other files that were not selected to be kept.
- Makes an archive of all of the files you selected to save during the backup process, it then moves that file to a safe place.
- It updates the internal
PACK_LINKvariable, which is used to determine which version of the pack you're installing. - It runs our re-installer, which will automatically pull the selected version of the pack and install it.
- Last, it extracts the archive it created before over the server files that were generated by the installer, so that any files you may have overridden or changed are preserved after the reinstall.
During step 6, a console viewer will be available at the bottom of the page (you may need to scroll down to see it on some monitor resolutions) where you can watch the install progress.
That's It!
Your server is now updated and you can start the server again and begin playing!